Missions
IRON NEST Mission 1 Walkthrough
Clear the combat phase, then rebuild the solution for the fireworks illumination correction.
Evidence map reviewed: 2026-08-17
The two-phase route and interface examples are grounded in release-version gameplay. Recorded coordinates are excluded because they are not a universal answer key.
Mission shape: two different fire problems
Mission 1, False Flag and Fireworks, is not one long target list. Release-version footage shows a combat phase followed by a deliberately different illumination task. Treating the second order like another HE mission is the fastest way to waste a prepared gun.
Quick answer: finish the hostile-target phase, wait for the order to change, then discard the old firing card and build a separate illumination solution. Keep the map icon glossary, elevation workflow and mission troubleshooting page open when one of those three stages is the actual blocker.
The reusable lesson is to rebuild the firing solution whenever the mission changes the required effect. Preserve the confirmed target position, but re-check shell type, observation origin, correction direction, range, charge and elevation.
Phase 1: clear the hostile elements
- Read the latest High Command message and confirm the requested target effect.
- Review the reconnaissance photograph before adding new map marks.
- Clear obsolete construction lines so an earlier firing solution cannot be mistaken for the active one.
- Plot each confirmed hostile element from the information in your run.
- Decide whether one impact area can cover clustered targets without endangering friendly or civilian markers.
- Build a fresh firing card, select the requested combat shell and verify the charge count before loading.
- Fire, then wait for the mission report or reconnaissance result before assuming every target was destroyed.
The release video demonstrates clustered hostile icons, but it also demonstrates why copying somebody else's impact point is unreliable: the current objective, markers and procedural state belong to that recording.
Phase 2: solve the fireworks correction
The illumination order changes both the ammunition and the geometry. The report supplies an observer position or bearing, then a correction from the previous impact toward the desired display point. Plot those as separate facts.
- Preserve the known observer marker.
- Draw the reported observer bearing or range to establish the first working impact point.
- Apply the yellow correction information from that impact point toward the requested display point.
- Draw a new line from the IRON NEST reference spike to the corrected point.
- Read the new bearing and distance; do not reuse the combat firing card.
- Select the illumination/STAR round shown by the live requisition card.
- Calculate the matching charge and elevation, then run the pre-fire checklist.
- After the shot, read the updated correction report. Repeat from the actual impact rather than adding a guess to the gun controls.
 123
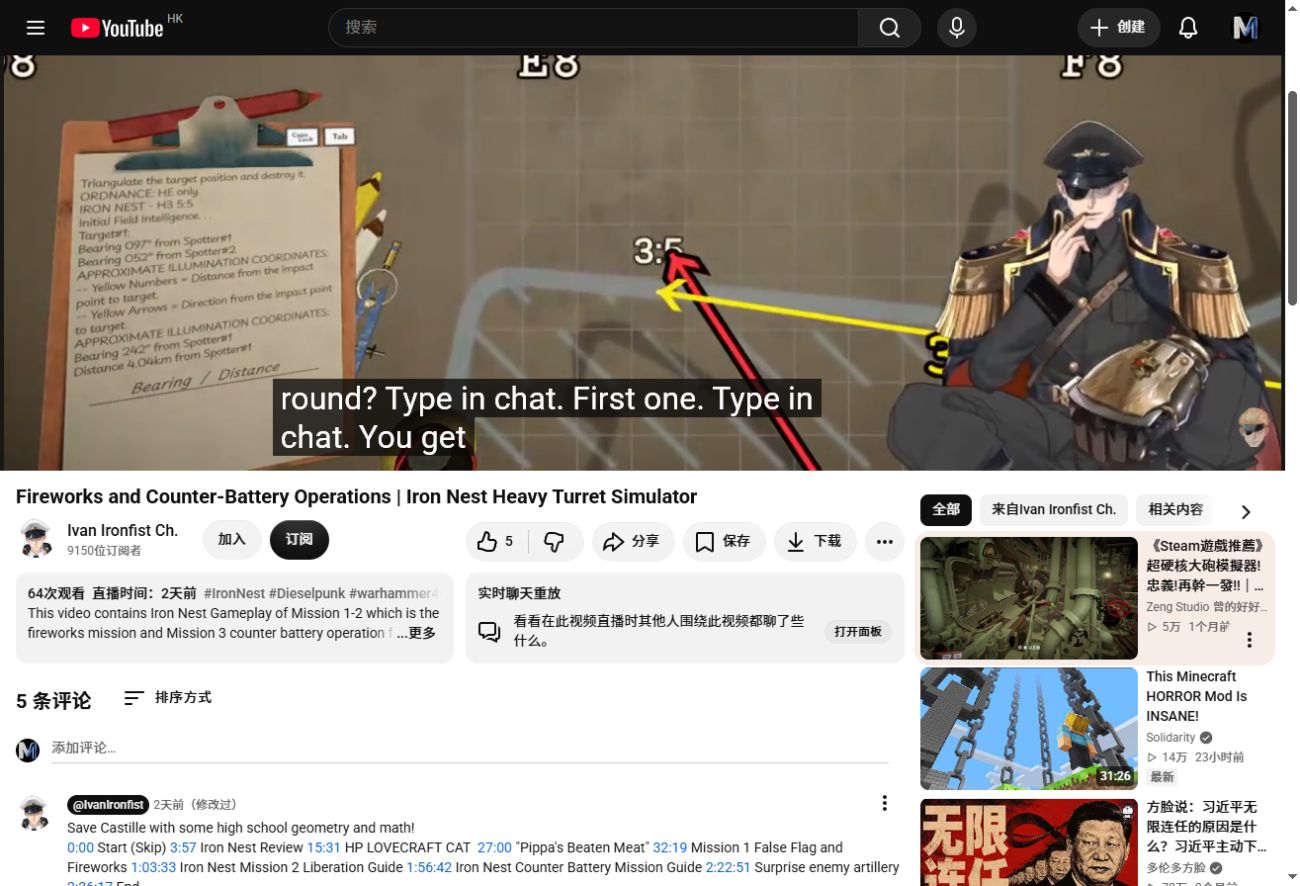
123- 1Clipboard: keep the ordnance requirement and the observer/correction statements together.
- 2Map vectors: distinguish the observation line from the correction that starts at the last impact.
- 3Corrected display point: create a new IRON NEST-to-target line before calculating the next card.
Frame captured from release-version gameplay. The streamer avatar, captions and broadcast overlays are part of the source video, not the game UI. Open the source at 52:14
Mission 1 troubleshooting
| Symptom | Check first | Recovery |
|---|---|---|
| The hostile phase will not finish | Latest recon photo and remaining hostile markers | Confirm each target state; do not start the fireworks solution until High Command changes the order. |
| The illumination shot lands in the wrong direction | Where the correction arrow begins | Apply the correction from the reported impact point, then re-measure from IRON NEST to the corrected point. |
| The map line has no useful bearing/range | Pen/tool choice and start point | Use the measuring line intended for firing data and start at the IRON NEST reference spike. |
| The correct point still produces the wrong effect | Shell type and loaded barrel | Verify STAR/illumination ammunition and the armed gun. A correct coordinate with HE is still the wrong mission solution. |
| A correction made the miss worse | Old versus new firing card | Discard the old card and recompute bearing, range, charge and elevation as one matched set. |
Mission 1 decision checklist
| Current mission state | Do this next | Do not carry forward |
|---|---|---|
| Hostile phase still active | Confirm remaining enemy markers and the requested combat effect. | A fireworks shell or correction from the later phase. |
| Order changes to illumination | Preserve the useful map reference, then build a new corrected display point. | The old shell choice, firing card or assumed impact effect. |
| Shot lands but correction follows | Start the correction at the reported impact and re-measure from IRON NEST. | A guessed addition to the previous bearing or elevation. |
Do not copy the numbers in the screenshot. Use the current teleprinter, map and calculator values. The image teaches which information belongs together, not a universal answer key.